
In 2022 I had hand surgery to repair a torn ligament. The healing process required wearing a hand splint for a few months. The splint made by the occupational therapist was annoyingly bulky, and this sparked the idea of trying to make a better custom splint with a 3D printer.
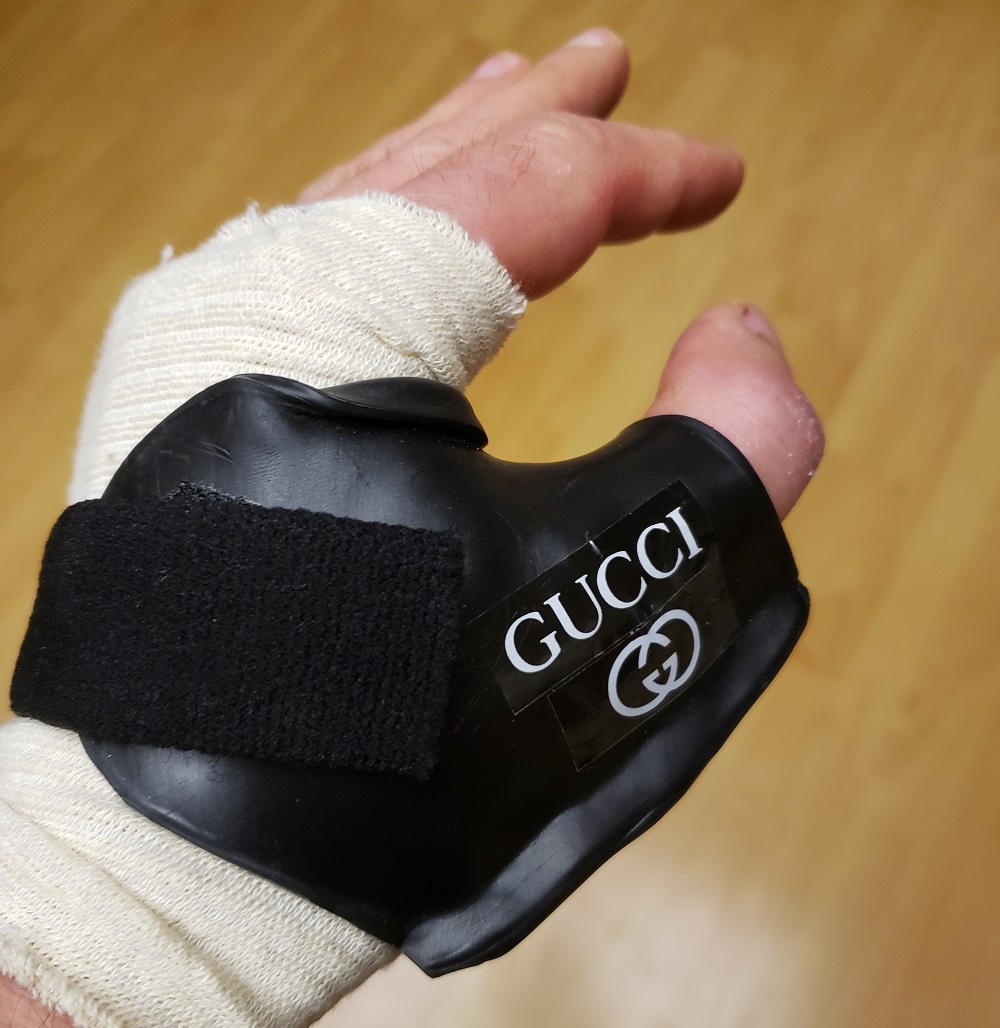 The original hand splint. Not bad, but the rib along the right side is annoying.
The following writeup details my attempts to produce the 3D printed splint. Originally I had considered the possibility of trying to commercialize this idea. However, I came to the conclusion that any sort of medical approval process would be arduous. Existing cast technology is also hard to compete with from a cost standpoint. These issues ultimately motivated me to document the process so others could benefit from the knowledge.
Despite the issues mentioned above, I currently believe that 3D printing technology is the future for high performance casting applications such as in athletes.
Disclaimer: I am not a medical professional. The following writeup is for educational purposes only. Consult a medical professional for injuries requiring casts or splints.
Existing Literature
As with all projects, the best place to start is a trip down the Google rabbit-hole to see who has tried this before.
Here’s a few resources I found about other attempts at making 3D printed casts:
- Direct 3D Printing of a hand splint using Reverse Engineering - Documents a software workflow for producing 3D printed casts.
- The development of a low-cost photogrammetry-based 3D hand scanner - A low cost hand scanning setup made from a raspberry pi and low-cost camera array.
- Activarmor - A company trying to commercialize 3D printed casts.
There are also a few cast models to be found on Thingiverse, but the modelling process typically isn’t documented.
Process Overview
At the high level, producing a 3D printed cast involves:
- Creating a 3D model of the body part.
- Designing the cast around the 3D model.
- Printing the cast.
The most difficult part of this process is trying to find a feasible way to produce a 3D model of the hand. I ultimately settled on photogrammetry, a technique which combines images from many different angles to produce a 3D model. Another approach to generate the 3D model could be to use an iPhone LiDar sensor or XBox Kinect. These might be better approaches, but here the selection was made based on what I had available.
After a bit more research, this is the detailed workflow I settled on:
- Take many images of the hand at different angles.
- Reconstruct the images to make a 3D model using 3DF ZEPHYR.
- Clean the 3D model to smooth reconstruction defects with Meshmixer.
- Model the cast in Meshmixer.
- Print the cast on an FDM printer.
Because my hand was badly injured at this point and extremely delicate, I decided to produce the hand model using my uninjured hand, and then mirror the model to make a splint for the correct hand.
Creating the Hand Model
Creating the hand model with photogrammetry required a fair bit of trial and error to get right. Even a single bad image will create defects (artifacts) in the 3D reconstruction. Some tricky aspects include:
- The hand must remain in the same pose for all images.
- Lighting must be similar for all images.
- Obtaining sufficient coverage and overlap of the hand, especially on the palm.
Attempt 1
My initial attempt was to put my arm through the aperture of a large Zaber rotation stage. A cell phone would be mounted on the stage and record video while the stage stepped throughout a full rotation in 10° increments. I would then extract video frames at the stationary points to get the images for reconstruction.
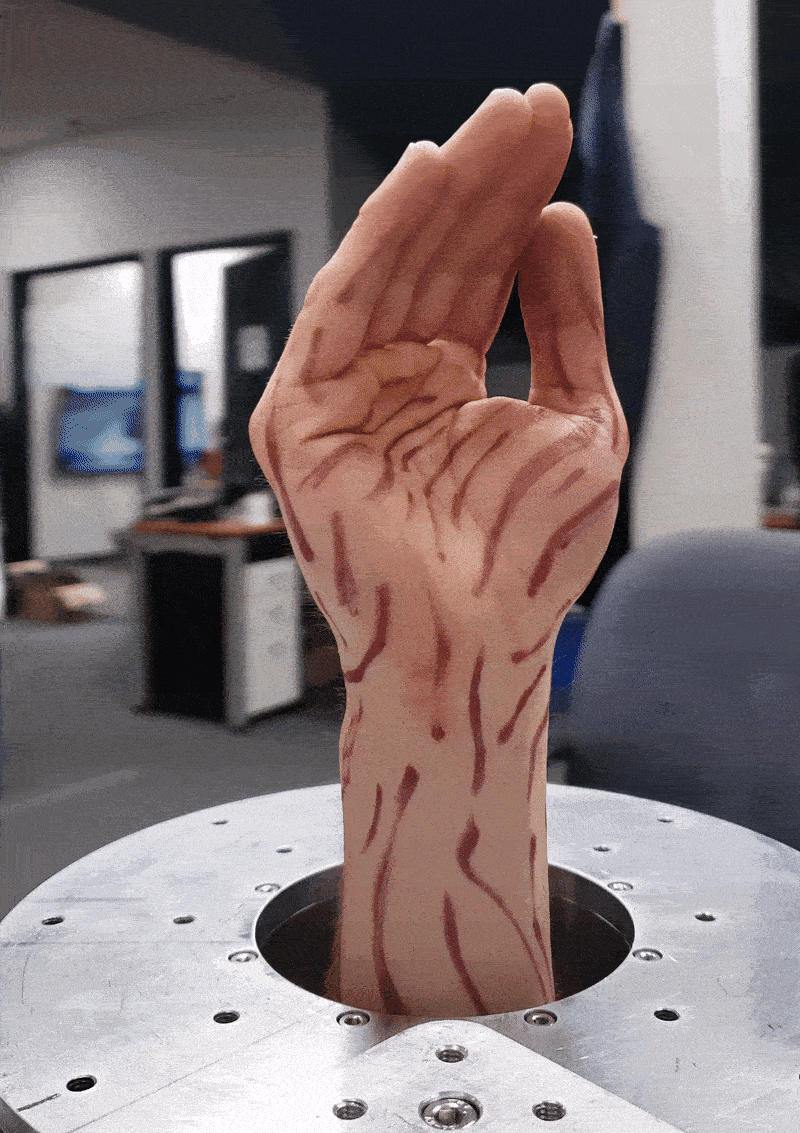 Live phone video during the scan. Note the slight lag from the phone’s video stabilization algorithm. Cool! The lines drawn on my hand help the reconstruction algorithm match images since the surface has minimal contrast.
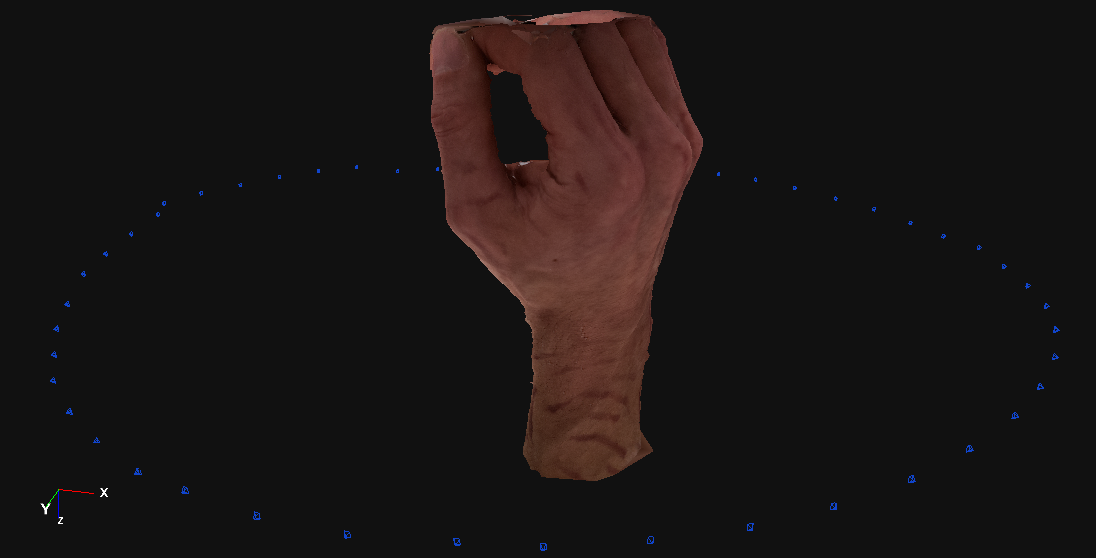
This actually worked pretty well! However, it wasn’t perfect. Firstly, notice how the estimated camera positions highlighted red in the reconstruction don’t overlap. I intentionally took images over more than 360° as a sanity check of the algorithm. These differing positions indicate that either my hand moved, or an error with the reconstruction accuracy.
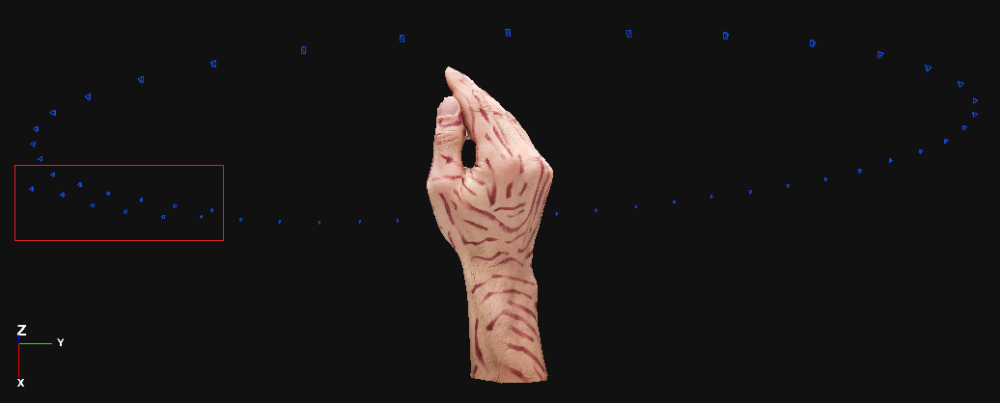 Reconstruction in 3DF Zephyr. Blue dots indicate the estimated camera positions at each image.
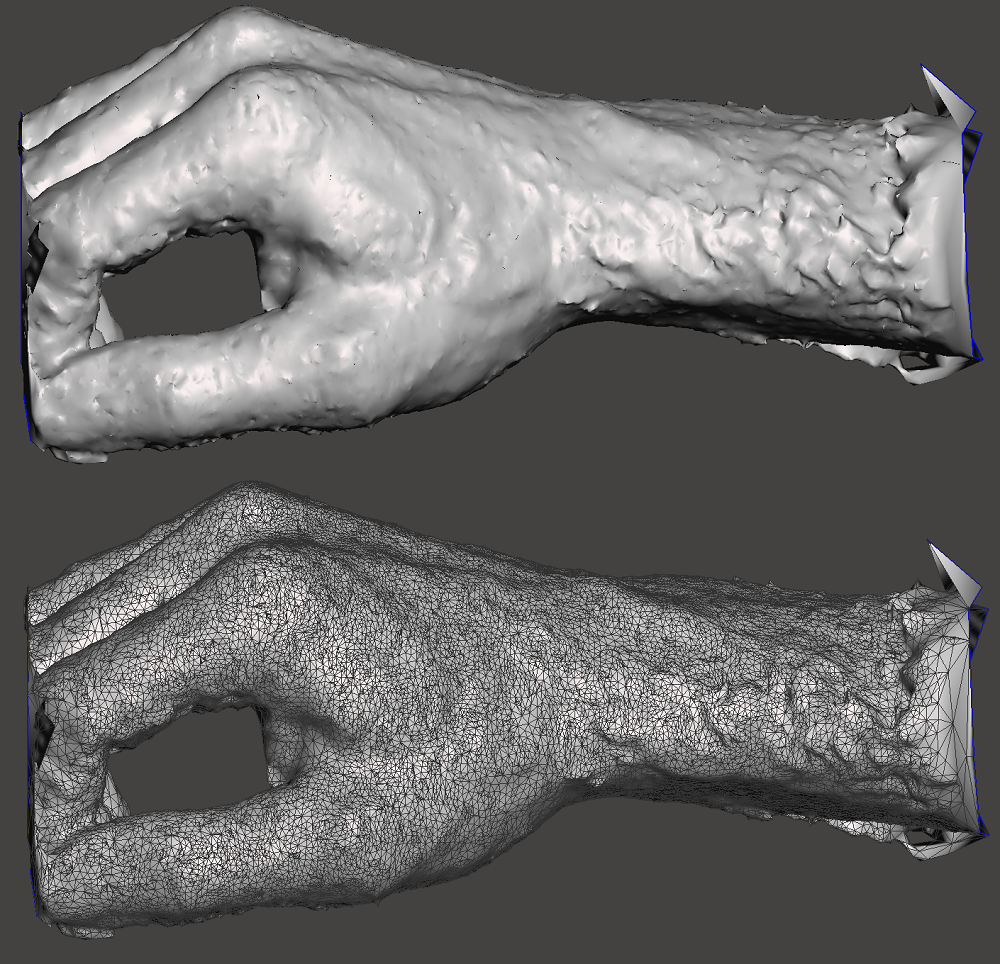
Looking closer at the reconstruction, there were more issues. The biggest problem is the lack of detail around the thumb, which happens to be the most critical area for this splint. Notice how the thumb and forefinger join together. This same issue is also present in the webbed skin joining the thumb.
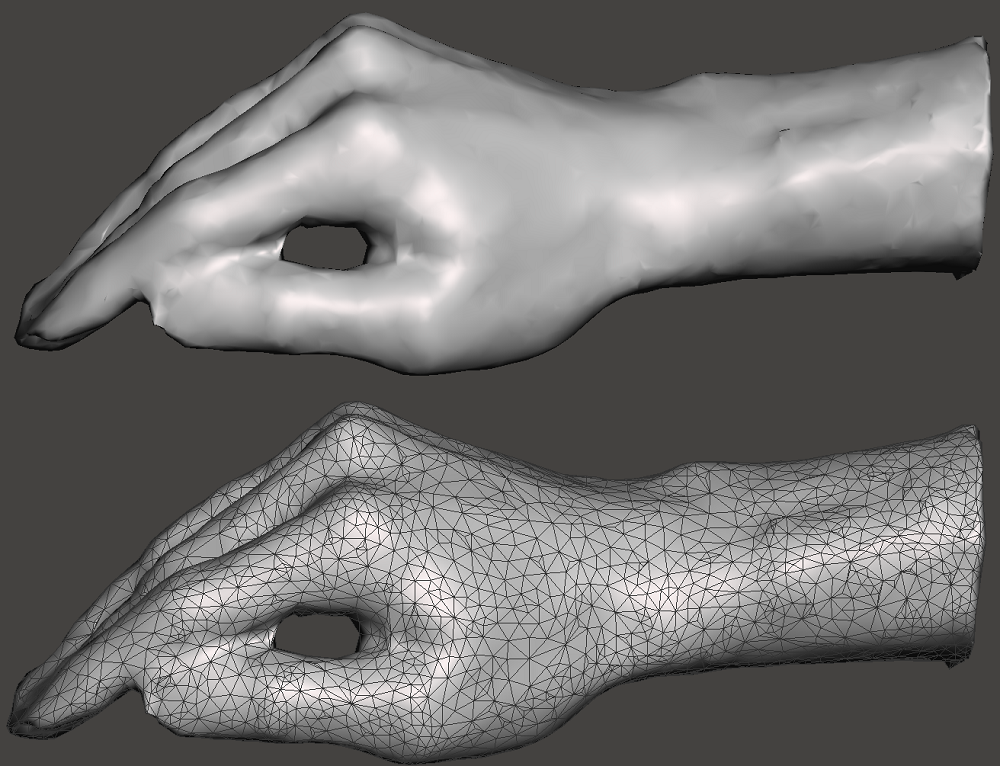 The reconstructed model imported into meshmixer.
In general, it seems like the overall shape is pretty good, but the finer details are missing. For example, there is also very little detail between the fingers. This result inherently makes sense though as the camera can’t easily “see” between the fingers; the gaps cover such a narrow field of view.
This model might be good enough for some casts, but not in this case where significant hand detail is required.
Attempt 2
These promising but not quite good enough results lead me on a search to improve accuracy. One thing worth noting is that it’s tough to get much accuracy around the thumb and inner palm with all the images taken from a single rotation plane. However, a 2-axis motion setup seemed unnecessarily complex.
In the end, these were a few tweaks I made in an attempt to improve accuracy:
- Adding a fixed post to hold onto with my hand. This should make it easier to keep the hand still.
- Using the phone to take images instead of a video. Images have significantly higher resolution.
- Adding a plain background. The background was a pain to remove accurately from each image in the first attempt.
One issue with this setup: how to trigger the phone camera automatically? It turns out that for android phones this can be done using the Android Debug Bridge (ADB) API. Additionally, ADB can be run over a wifi connection, and there’s also a python library for it. Here’s a link to the python script I wrote to accomplish this.
Ultimately I arrived at the setup shown below. I was debating brown vs white backgrounds, but ended up going with white because the contrast relative to skin is higher.
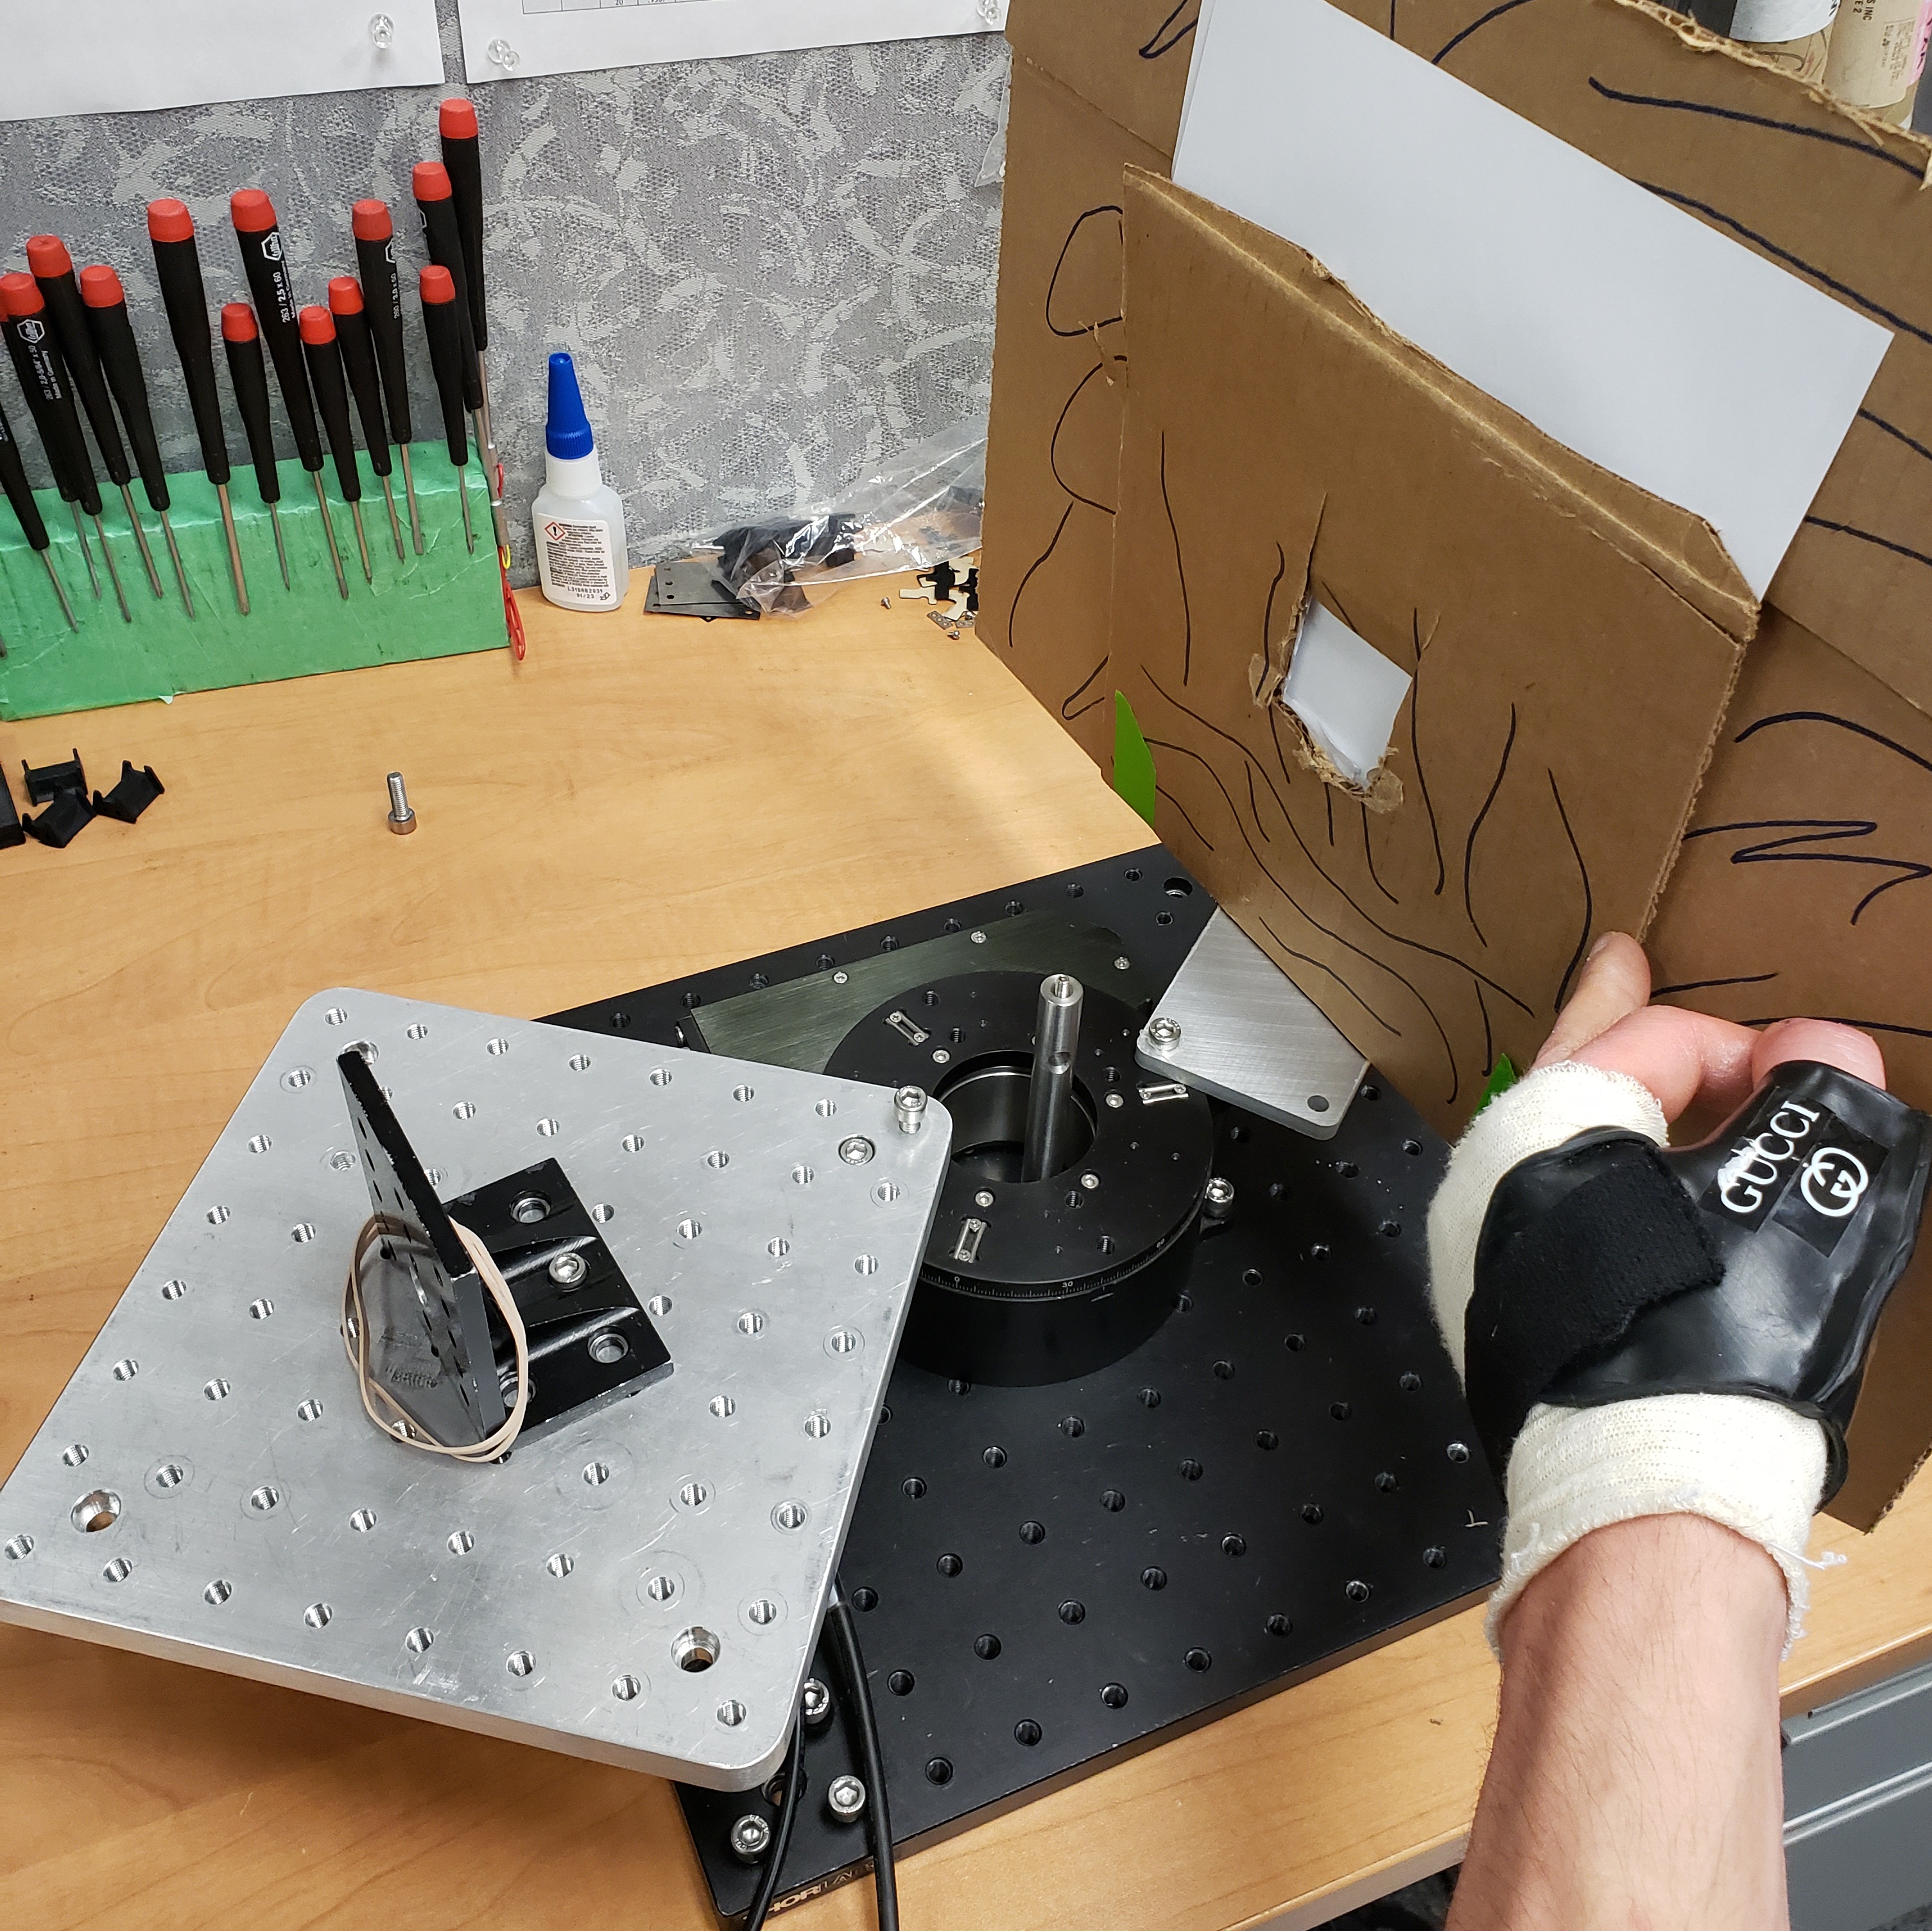 Imaging setup for the 2nd attempt. It’s a little awkward to put your arm in from the top, but oh well.
These changes did improve the accuracy. The reconstruction detail looked much better around the thumb, but the camera angles still didn’t match up perfectly at 360°. Oh well. Note that the top of the hand wasn’t captured, but that’s ok - we don’t need it.
 2nd Reconstruction in 3DF Zephyr. Still not perfect, but much better.
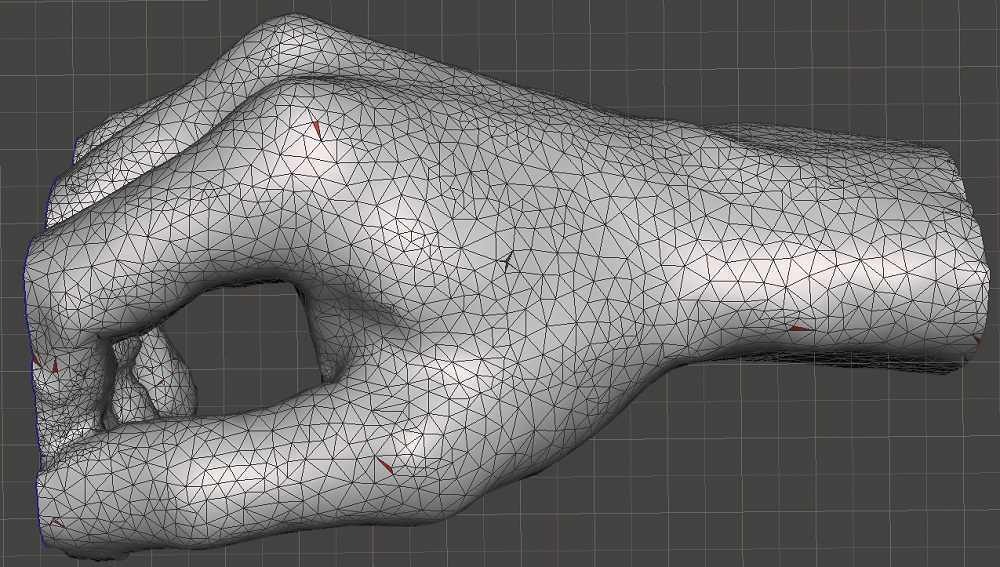
Looking closer, the 3D model also has much higher detail, but with weird spikey artifacts all over it. I think these are due to my arm hairs! Doh! It might be possible to get better results with a darker background. Or shave your hand!
 The model in meshmixer. Notice how much finer the mesh is. The detail is quite impressive actually.
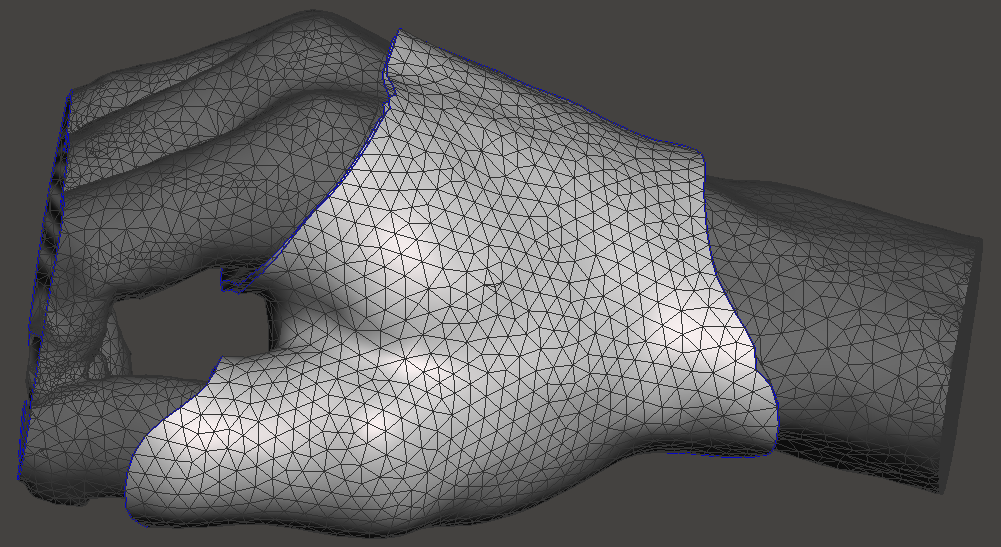
Thankfully, meshmixer has an excellent RobustSmooth tool which is extremely effective at smoothing irregularities without changing the overall geometry much. The Reduce tool was also used to make the triangle density more reasonable for cast modelling. This might seem like we’re back where we started, but at least now I can trust the geometry.
 The cleaned model ready for cast modelling.
Modelling the Cast
Here is the general process I settled on for creating a cast in Meshmixer:
- Select the approximate region of the model you want to cover with the cast.
- Make the selected region have a smooth outer edge.
- Use the
Select -> Modify -> Smooth Boundarytool.
- Use the
- Offset the selected region to create the inner surface of the cast.
- Use the
Select -> Edit -> Offsettool. -
Connectedmust be unchecked.
- Use the
- Split the offset region into a new object.
- Use the
Edit -> Separate Shellstool.
- Use the
- Select the offset region and offset it again to make the outer surface of the cast.
-
Connectedmust be checked this time.
-
- Re-mesh the cast to have a fine mesh density.
- Use the
Select -> Edit -> Remeshtool. - Increasing density is important to make sure the smooth tool isn’t too aggressive on the edges.
- If this makes the model too slow, use the
Sculpt -> Brushes -> AdaptiveReducetool to reduce density away from the edges.
- Use the
- Smooth the edges of the cast.
- Use the
Select -> Deform -> Smoothtool.
- Use the
You may have to play around with different offsets to get the fit correct. I found 1mm offset to be too tight, but the issue was mostly with getting my thumb through the narrow passage. This might not be an issue for other cast types. Ultimately I went with a 2.5mm offset from the hand and 1.5mm wall thickness.
 The inner and outer layers of the splint. The goal of this splint is to prevent the thumb from being bent away from the hand.
At this point the rough cast shape is created, and you’re ready to do any tweaking:
- The
Sculpt -> Brushes -> RobustSmoothtool is useful for smoothing sharp edges. - The
Sculpt -> Brushes -> Dragtool is useful for loosening potentially tight spots. - The
Edit -> Make Patterntool can make air holes in the cast.- Use the
Edgessetting. - Note: this tool will apply the pattern to the whole model, but holes will only go through where the mesh density is coarse. Adjust the mesh density with brushes to get the desired result.
- Use the
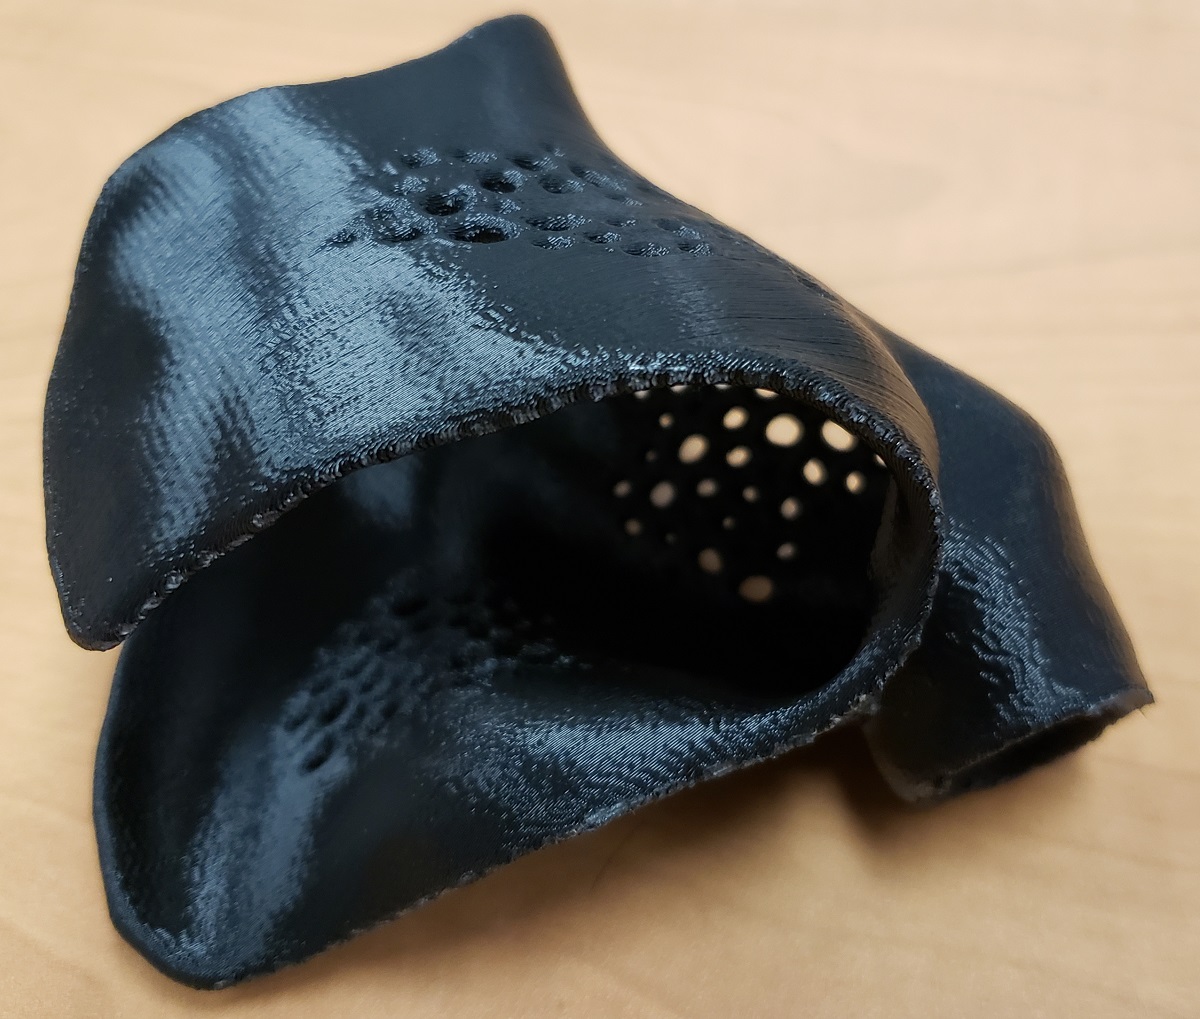
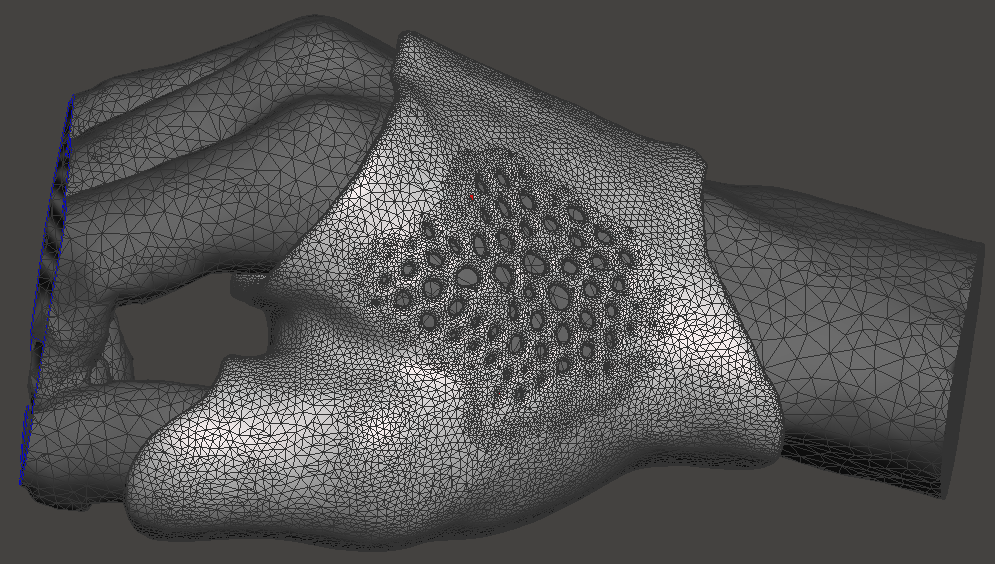 The completed splint model. The organic holes make it look creepy, but who wants a sweaty hand!
The model is now ready for export and printing. You may have to play around with print orientations to find a suitable one with no supports on the inside.
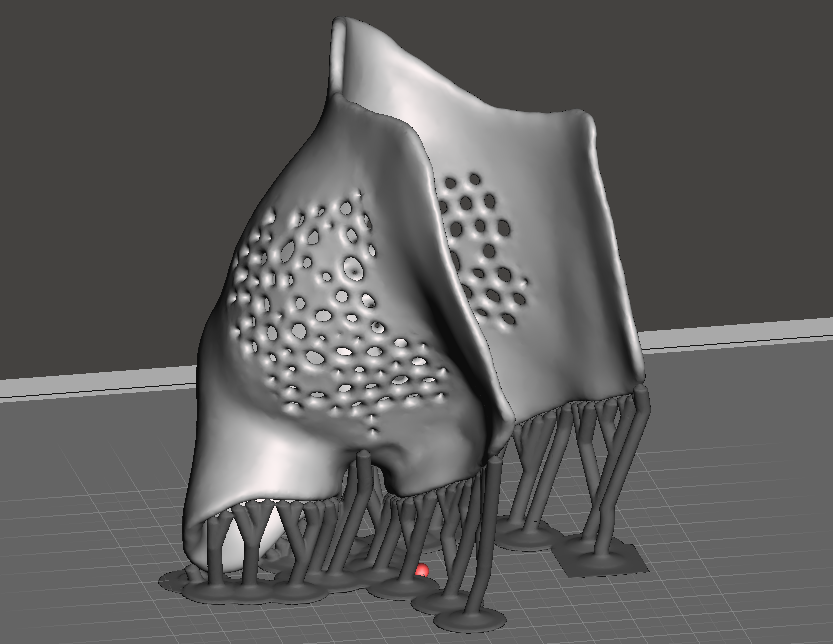 The model orientation for printing.
Results
The finished splint turned out great! I was worried the 3D printed surface would feel rough, but this was not the case; it feels extremely comfortable and form-fitting. The thickness of 1.5mm seems to be plenty strong, but I might consider printing it out of ABS to reduce the risk of shattering for things like sports.
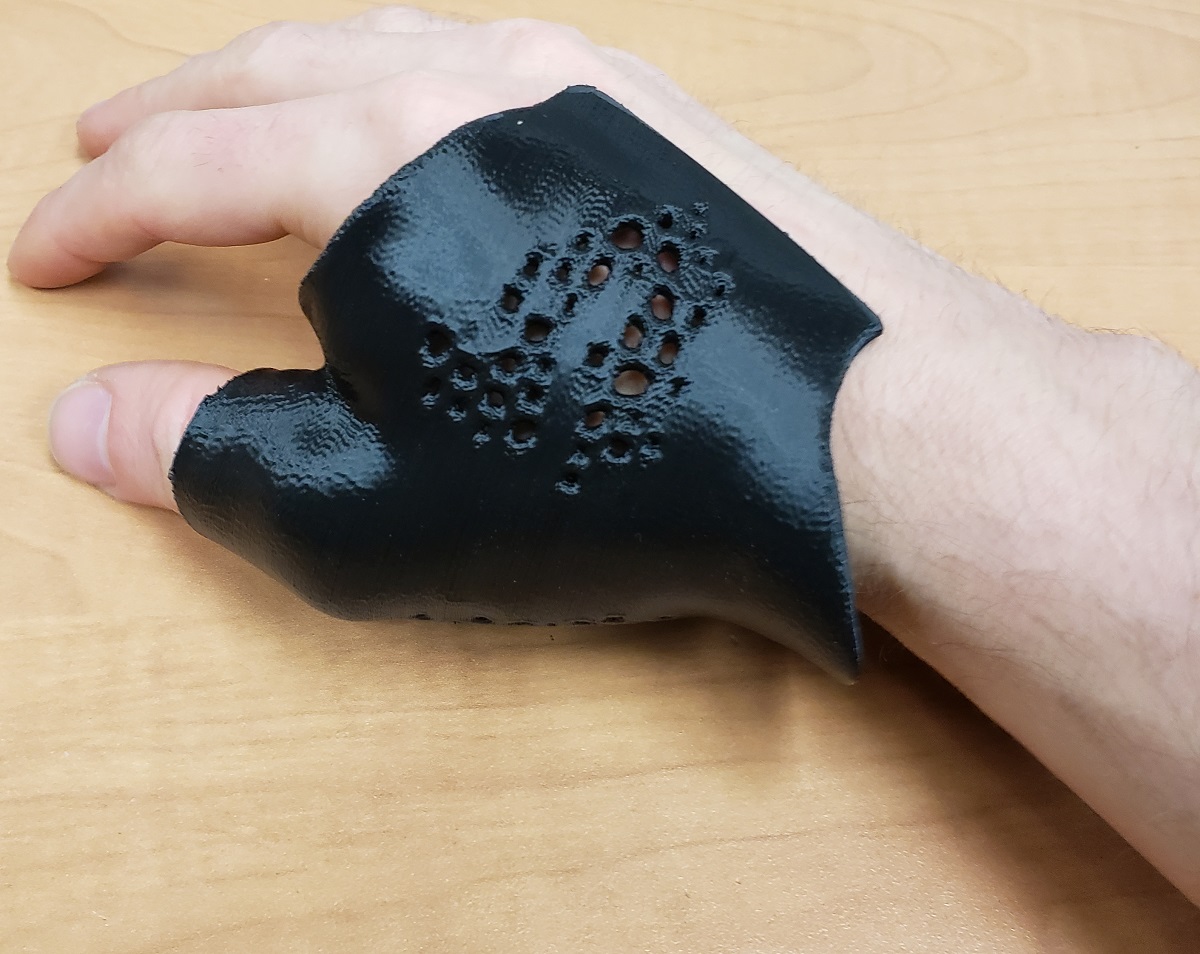
It should be noted that I never actually produced the splint for my injured (left) hand. By the time I had gotten this far in the project, I didn’t need to wear the splint for much longer. Fitment of the thumb was also difficult, and I was worried that if my hands varied much left-to-right that I could risk getting my injured thumb badly stuck in the splint. Ultimately though I’d consider this result a success. The project was primarily one of those “can I do it?” things.
Future Work
It’s worth noting that most people don’t have a fancy motorized rotation stage for taking images. I’d be very keen to see what kind of results could be achieved by a friend taking a bunch of pictures at various angles. I suspect with a more sophisticated restraint to hold the wrist in place this could produce excellent results.
I’d also be interested to try imaging using a phone camera taking slow motion video. This could potentially enable creating a dataset from a single motion without stopping. For example, a camera could simply be mounted to an arm with a bearing pivot (think skateboard wheel) and swung around the sample in one motion.
There’s also plenty of low hanging fruit in terms of automating the reconstruction and cast modelling process. With a couple of purpose built software tools, nearly the whole process could be automated.
Closing Thoughts
This project is interesting from a business standpoint. The potential patient benefits for 3D printed casts are huge, including far more opportunities for comfort, waterproofing, cleanliness, and mobility, to name a few.
Despite the benefits, the manufacturing process is inherently more complex for 3D printed casts. In addition to a 3D scanner and reconstruction software, 3D printers of sufficient volume and speed are needed to create the casts. Currently, a conventional cast can be made in half an hour, while a print could easily take several hours.
3D printed casts could also be tricky from a medical liability and certification standpoint. As much of the generation process requires automated software, certain bounds need to be put in place to ensure an automatically generated cast would have sufficient strength, etc. The liability/certification issue in particular is a big hurdle to surpass. In general, it seems like the medical industry moves quite slowly with new tech (rightfully so!).
Ultimately, with the current state of technology, the complexity issues of 3D printed casts restrict the practical feasibility to higher performance applications like athletes or people who require long term immobilization. It’ll be interesting to see if this changes in the future as 3D printing technology improves. I suspect it will eventually!
